
9-V Power Supply -- For Ceramic Cartridge Preamp

This is a 9 V power supply circuit that uses a full-wave bridge rectifier to convert AC current to DC. This circuit is for the ceramic cartridge preamplifier circuit that I have built, and provides a very clean voltage that is free of any mains hum. As you can see, it is a very simple circuit that uses four 1N4004 power diodes to form the bridge rectifier. Each diode has a 0.1 µF capacitor in parallel with it. The capacitors are metallised polyester film type of 10 % tolerance and 100 V. I got a bag of ten for a pound; hence I used one on the output rail as well. As you can see, it is an extremely simple design, and there is no requirement for a voltage regulator, providing your transformer has a correct voltage rating.
Layout and Components

| Part Number | Value | Additional |
| D1 | 1N4004 | Power Diode |
| D2 | 1N4004 | Power Diode |
| D3 | 1N4004 | Power Diode |
| D4 | 1N4004 | Power Diode |
| C1 | 0.1 µF | 10 %, 100 V, (Metallised Polyester) |
| C2 | 0.1 µF | 10 %, 100 V, (Metallised Polyester) |
| C3 | 0.1 µF | 10 %, 100 V, (Metallised Polyester) |
| C4 | 0.1 µF | 10 %, 100 V, (Metallised Polyester) |
| C5 | 0.1 µF | 10 %, 100 V, (Metallised Polyester) |
| C6 | 2200 µF | 25 V Electrolytic |

You should always use a fuse for safety reasons, and here, I am using a salvaged fuse holder and fuse.

The electrolytic capacitor is 2200 µF (25 V), and here you can use a wide range of values providing it is greater than 1000 µF and 10 V.

The 1N4004 is a rectifier diode often found in commercial high-end amplifiers. These are very low cost and I managed to get 50 for less than a pound.

The current requirement of a one to two transistor preamplifier circuit is usually extremely small and therefore we can use a small cheap mains transformer. I am using a salvaged one that was originally part of a standby circuit. Its current rating is 250 mA, and outputs 7 V AC. After rectification, the circuit provides approximately 9 V DC, which is sufficient for the preamplifier.
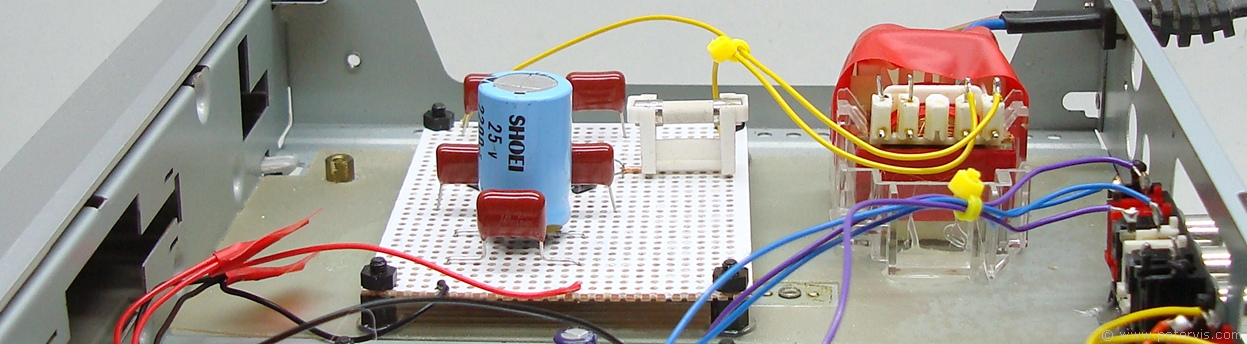
This is how it would look when installed inside a case.