All in 1 HDD Docking No Drives Showing
If the All in 1 HDD Docking Station is not working and no drives are showing in My Computer, then this page might help. Having used this unit for many years on Windows 7, I have noticed that on occasions one does not always see the disk drive in My Computer. Many novices tend to think that they can plug in any drive with any partition structure and any file system, and Windows 7+ should show them the drive with a drive letter in My Computer. Unfortunately, this is just not the case and one has to consider where the drive came from and what type of partition and file system it has. For example if the drive came from a Linux computer, or Unix computer, then Windows 7 generally does not provide a drive letter, and therefore there will not be a drive showing in My Computer. I have noticed that on occasions when the drive contained non-standard DOS partitions it can still be a problem. On occasions, when the drive came out of a satellite box, or a PVR, and it contained non-DOS partitions, then Windows 7 will not assign a drive letter and you will not see the drive in My Computer.

Usually novices tend to look in My Computer first, and if they do not see a drive, then they give up and assume the dock or the computer is faulty. However, there are other places you can also check to see if the connection between the dock and the PC are good. In Windows 7, the first place to check is in Devices and Printers. In that window, you should see two icons called USB Storage, and USB to ATA/ATAPI Bridge. These icons appear when you switch ON the dock and they automatically disappear when you switch OFF (make sure hard drive is plugged into the dock first). If you can see these icons, then the dock is working, and the connection is working. Then the next place to check is in Computer Management, where you should select Disk Management under the Storage icon.
Computer Management separates the men from the boys as they say, because from here, you can see the partition geometry and file system any drive has, and even change it. Usually, when you switch ON the dock the new drive will appear here, and it disappears when you switch OFF the dock.
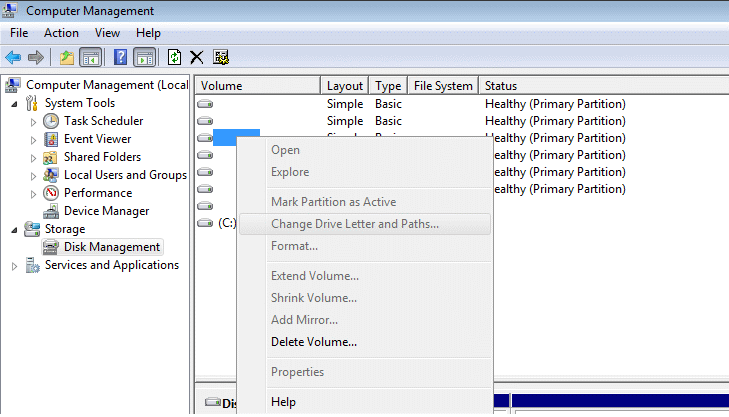
As you can see in the screenshot (top of this page), I had a drive (Disk 8) with non standard partitions, which would not show up in My Computer. The drive came out of a satellite box and for some strange reason, it had these multiple primary partitions, which was confusing Windows 7. In the top pane, you can see seven drives but there is no drive letter assigned to each drive. However, Windows 7 does indicate that the Disk 8 is online and the primary partitions are healthy.

When I selected one of the volumes and right-clicked on it, a menu appeared, however I could not assign a drive letter as that option was greyed out. Only the Delete Volume option was available.
I did not need the data in the drive, so from here I was able to delete all the volumes and format the drive with an NTFS file system. Once it is formatted, Windows asks if you would like to assign a drive letter. You choose the letter you want, and after that, you should see the drive in My Computer. Obviously, it will be empty because you deleted all the partitions and formatted it!
This Article Continues...
All in One HDD DockingInside Look
All in One HDD Docking Station How to Use Instructions
All in One HDD Docking IDE Not Working
No Drives Showing
IDE / SATA Docking Box and Packaging
IDE / SATA Docking Station Adapter Power Supply
