20V PSU for Quadraphonic SQ Decoder
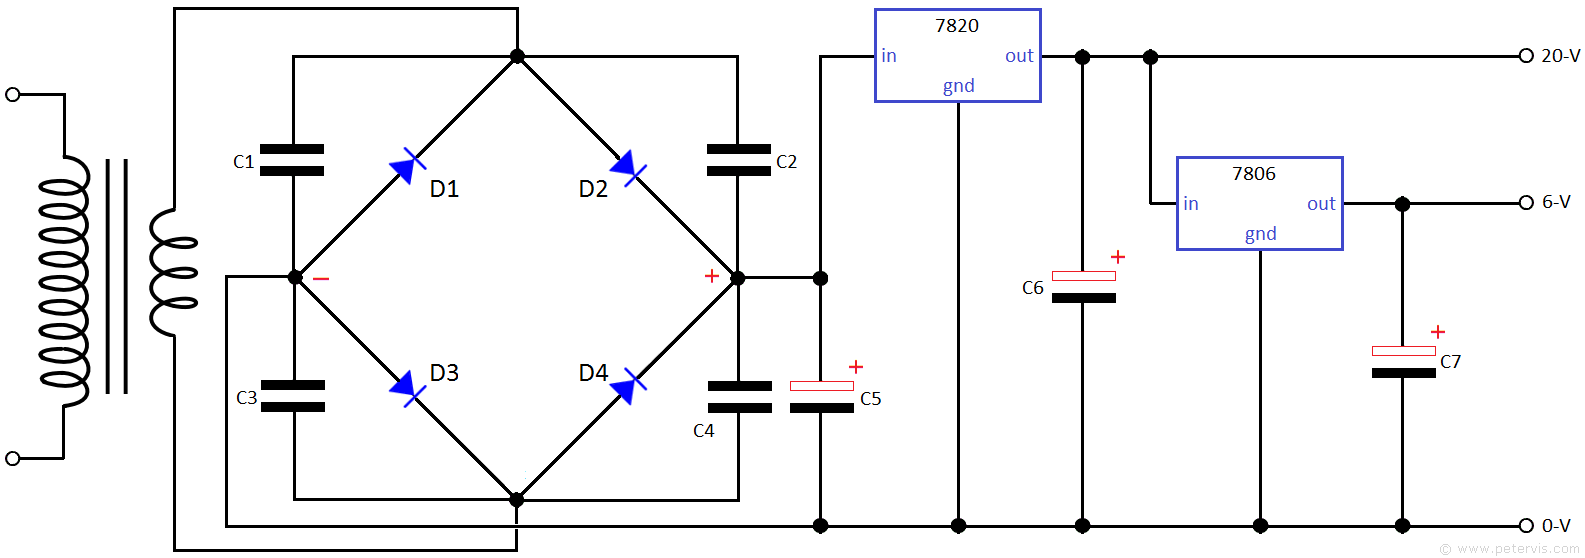
The quadraphonic decoder circuits require 20 V for operation and therefore I decided to design this power supply circuit for it. Just like most hobbyists, I had some small old-fashioned transformers, however nothing that would produce exactly 20 V after rectification, hence in this design I am using a 20 V regulator to establish the precise voltage from a larger voltage transformer. The L78 series voltage regulator from STMicroelectronics Corporation will accept up to 40 V input. Hence this gives the constructor much leeway when choosing the transformer. I found a salvaged transformer, which after rectification, gave approximately 24 V DC, and after regulation, the output was 20 V. Obviously this was in the absolute low end of the range, but ideal for my needs as the transformer was small and could be housed in a small case.
For the current requirement, one advantage of these integrated circuits is that they require extremely low supply current. The approximate maximum supply current for the MC1312P, MC1314P, and MC1315P, is 21 mA, 25 mA, and 13 mA respectively. However the only recycled transformer I had that was capable of producing the required voltage had current rating of 500-mA. Hence there was plenty of reserve power if in the future I wished to add more circuits such as a quad headphone amplifier to drive my homemade quad headphones.
As you can see, this bridge rectifier design is a little bit more special than what you will find elsewhere, with the inclusion of metallised polyester film capacitors across the diodes. Here, I was aiming for a high quality design free of any hum, and this design has worked very well for me in the past in commercial applications. For the fuse holder and electrolytic capacitors I was able to use salvaged parts.
In this design, I have also included a regulated 6 V power supply rail which is to be used in the gain control circuit based around the MC1314P. As seen in their documentation, in their design, they are using 910 Ω and 560 Ω resistors to form a potential divider (PD) to produce 6 V from the 20 V rail. A downside of this design is that a PD will effectively load down the supply rail, and introduce noise when the potentiometers are adjusted. Hence, a dedicated 6 V rail that is regulated, will obviously provide superior performance, and the advantage here is that one does not have to look for those resistors for the PD, thereby saving money!
Board Layout
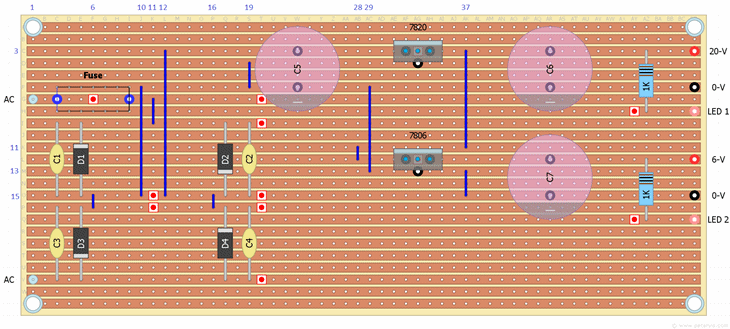

You might have spotted in the board layout that I am using a pair of 1 kΩ resistors. These are optional, and I decided to include them in case I wanted to have LEDs (one for each voltage rail). It turned out that the enclosure I managed to find for these circuits was a SKY satellite box which has LEDs at the front, and it occurred to me that they may be used here in my project.
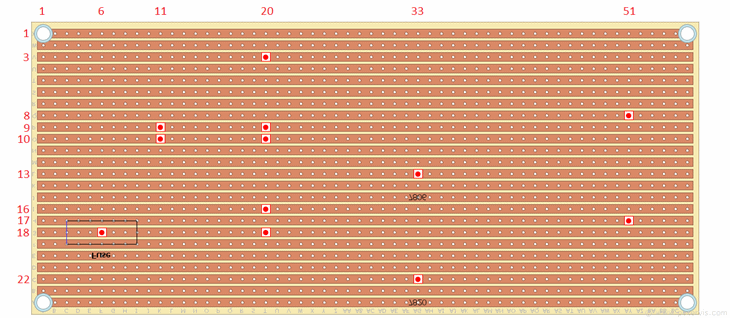
Track Cuts
Component List
| Type | Part Number | Value | Description |
| Resistors | R1 | 1 kΩ | Metal-film, 1/4-watt, 5 % |
| R2 | 1 kΩ | Metal-film, 1/4-watt, 5 % | |
| Capacitors | C1 | 0.1 µF | 104K Metallised Polyester Film |
| C2 | 0.1 µF | 104K Metallised Polyester Film | |
| C3 | 0.1 µF | 104K Metallised Polyester Film | |
| C4 | 0.1 µF | 104K Metallised Polyester Film | |
| C5 | 3300 µF | 50 V, Electrolytic | |
| C6 | 6800 µF | 25 V, Electrolytic | |
| C7 | 2200 µF | 10 V, Electrolytic | |
| Semiconductors | 20 V Regulator | 7820 | L7820CV |
| 6 V Regulator | 7806 | L7806CV | |
| D1, D2, D3, D4 | 1N4004 | Power Diodes | |
| Misc | Stripboard | 24-strips × 56-holes |
I was able to procure the cheapest components from places such as eBay, and it worked out cheaper as many components came in packs of ten and twenty, with affordable realistic postage. When buying the voltage regulator, be very cautious, as there are fake ones around as well. Obviously, measure the output voltage to make sure it is regulating. If you get extreme levels of hum and improper voltages then it may be a fake!
Capacitor Lead Spacing
| C1, C2, C3, C4 | 7-Holes | |
| C5, C6, C7 | 4-Holes |
Make sure your capacitors have the correct lead spacing, as this will save you a lot of time having to bend the leads later when you install them.
This Article Continues...
20V PSU for Quadraphonic SQ DecoderFinal Build
Build Links
Build Soldering
LM317T Mod